FTC Disclosure: Delicious Obsessions may receive comissions from purchases made through links in this article. As an Amazon Associate I earn from qualifying purchases.Read our full terms and conditions here.
Milk kefir (as opposed to water kefir) is something that I use somewhat regularly in my kitchen. I use milk kefir primarily for making homemade salad dressings, like my Better Than Hidden Valley Ranch Dressing, or for adding into smoothies for a probiotic kick. I also give it to the dogs over their food, because our pets need good bacteria in their guts too!
What is Milk Kefir?
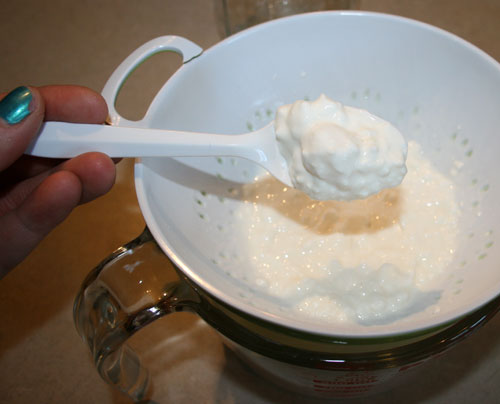
Dairy kefir is a probiotic, cultured beverage that is teeming with lactic-acid bacteria, yeasts, enzymes, minerals, and vitamins. It originated in the North Caucasus region by shepherds who discovered that if they put fresh milk in their leather pouches, it would ferment into a slightly carbonated beverage1. Nowadays, it is cultured by adding kefir grains to fresh milk. Kefir grains are not actual grains, rather clumps of bacteria and yeasts that could also be called a scoby (symbiotic colony of bacteria and yeasts). The grains themselves look like small clumps of cauliflower or cottage cheese and have a gelatinous texture. See my picture below.

According to the comprehensive list on the Cultures for Health website, milk kefir grains are a combination of a complex community of up to 27 different strains of bacteria and 27 different strains of yeasts. The amounts and presence of these different types of bacteria and yeasts are going to vary from culture to culture and there really is no good way to guarantee what your specific culture contains, short of sending it to a lab for scientific testing. So, unless we want to do that, let’s just say the cultures contain a bunch of good stuff!
Milk kefir is quite popular in Northern and Eastern Europe. Also, it has been widely consumed in Chile for over 100 years and is thought to have been introduced to the region by former Ottoman empire migrants. Because of the spread of information about the drink and its health benefits, it is rapidly gaining popularity in the States, UK, and Australia2.
Milk kefir contains vitamin A, vitamin B1, vitamin B2, vitamin B6, vitamin B12, vitamin D, folic acid, nicotinic acid, calcium, iron, iodine3. It is reminiscent of a drinkable yogurt with a similar tartness, and the longer it cultures, the more sour it becomes. One plus of letting your kefir culture longer than 24-48 hours is that the folic acid content increases significantly4. It is also not uncommon to have your milk kefir become slightly effervescent, which makes it a fun drink for the kids (and big kids!).
Another interesting nutrient in kefir is called kefiran. One study showed that kefiran reduces blood pressure and serum cholesterol5. Granted, this study was done on rats, but I have had more than one person mention to me that when they drink kefir regularly, their blood pressure normalizes.
How Do I Make Milk Kefir?
The process of making milk kefir is similar to water kefir, except you use milk and a different strain of grains. There is going to be a difference between the varieties of yeasts and bacteria present in milk kefir grains versus water kefir grains, so you want to make sure you use the correct ones for each cultured beverage.
During the fermentation process, much of the lactose in the milk is turned into lactic acid however, the finished product will still contain anywhere from 20-50% of the lactose. Some people who are sensitive to lactose find that they can tolerate kefir without the normal side effects that they would experience with regular milk. However, this will vary from person to person, so it’s best to avoid, or experiment cautiously, if you are sensitive to dairy and/or lactose.
You can use other non-dairy milk, like coconut milk, but I have never done that before, so I can’t attest to how well it works or tastes. For specific information on how to make non-dairy kefir, check out this Coconut Milk Kefir recipe from Divine Health From the Inside Out.
I make two forms of dairy kefir — milk kefir (using whole milk) and kefired cream (using fresh cream). They are both delicious and can be used in similar ways. Kefired cream makes amazing ice cream and that is probably my favorite way to consume it.
There is no right or wrong way to make kefir, nor is there a standard recipe. It’s more like a set of principles and you can adjust them to work in your specific environment with your ingredients. Honestly, I don’t think I’ve ever measured my kefir grains, I just “guesstimate” and I am successful each time, so it obviously is not a precise science. One thing to keep in mind is the more grains you have in the milk, the faster it will culture. Also, like water kefir, milk kefir should be done in an anaerobic environment, which is why I an anaerobic fermenting vessel to brew mine.
Milk Kefir “Recipe”
Ingredients
- 1 quart of fresh milk (Raw is best, if you have access, but pasteurized is fine. Never use ultra-pasteurized milk.)
- 1 heaping tablespoon of active, fully hydrated milk kefir grains. If you have brand new dehydrated grains, you’ll want to make sure they are fully hydrated and active before starting big batches of kefir.
Instructions
- Using a sanitized anaerobic fermenting jar, stir your milk and kefir grains together gently. To sanitize, either wash with hot water and a nontoxic soap, rinse well, and let air dry, or place it in a large pot with water and let it boil for 2-5 minutes. Remove from the hot water and let the jar cool before adding your milk and kefir grains.
- Close the lid, add your airlock, and let sit at room temperature for 8-24 hours (I stick mine in a cupboard). The reason for this wide range of fermentation time is because each environment differs, especially the temperature of the house. If your house is cool, it might take the full 24 hours, but if it’s super hot (like mine right now), it might only take 8-12 hours.
- The kefir is done when the milk has thickened and it has a slightly sour (but not unpleasant) and yeasty smell. If it cultures for too long, it will separate into curds and whey, but that is OK if that happens. It just means it went a little too long. Make a note of the duration and check it a little sooner the next time around. But, it is completely edible and it is easy to get it to reconstitute.
- When the kefir has thickened, take a plastic colander or strainer and place it in a glass bowl or big measuring cup. Pour the finished kefir in there. The kefir will filter down through the strainer and leave the kefir grains in the strainer. You want to always use plastic, as metal can react negatively with the kefir grains. You can use a spatula or plastic spoon, and gently move the kefir around and let it strain into the bowl below. Careful not to use a lot of pressure, because you can smash the kefir grains. Sometimes I just pick up the colander and gently tap it up and down and let the kefir strain that way.
- When you’ve filtered out your kefir grains, just place them in another jar of milk and repeat the process. Since this is a fast acting ferment, it’s easy to quickly become overwhelmed with kefir! If this happens, just place your kefir grains in a small glass jar in the fridge with a little milk. Change out the milk every week if you’re not going to be making full batches regularly.
- If you want to take it a step further, do a second ferment of your milk kefir. This is similar to how you do a second ferment with water kefir or kombucha. A second ferment on the milk kefir yields a much more mild and delicious kefir. You can add all sorts of flavorings — I personally love orange and lemon peels, sliced peaches, or a couple cinnamon sticks. You could also use savory herbs if you were using the kefir for salad dressings, etc. To do the second ferment, just put your finished milk kefir (without the grains) in a clean anaerobic jar with whatever flavorings you want. Close the lid and let it sit out for another 8-24 hours. Keep an eye on it if your house is really warm, as it will ferment very quickly.
Kefired Cream “Recipe”
Again, like milk kefir, there really is no set recipe for this. It’s all about proportion. The more grains you add to the cream, the faster it will ferment, and vice versa. It’s really just like milk kefir, except you use heavy cream instead.
Ingredients
- 1 quart of fresh heavy cream (Raw is best, if you have access, but pasteurized is fine. Never use ultra-pasteurized cream.)
- 1 heaping tablespoon of active, fully hydrated milk kefir grains
Instructions
- Follow the same instructions for the regular milk kefir.
- The kefired cream will be much thicker and richer than plain milk kefir. Perfect for making kefir ice cream, butter, sour cream, crème fraîche, and more.
So, tell me. Do you make milk kefir? Have you made kefired cream before? How about using the Fido-jars? I would love to hear your experiences, so leave me a comment below!
References
- “Kefir“. Wikipedia. 6/29/12


73 Comments