FTC Disclosure: Delicious Obsessions may receive comissions from purchases made through links in this article. As an Amazon Associate I earn from qualifying purchases.Read our full terms and conditions here.

For week 21, I shared my recipe for Dilly Carrots with you. That recipe was done in a regular Fido jar which resulted in a much better tasting ferment than I ever got with a Mason jar.
Since that post, I have started using anaerobic fermenting vessels and recommend the ones from my affiliate partner, The Probiotic Jar. I have revised the original recipe for those types of jars. The main difference between my old recipe and my new recipe is that we no longer use whey and the brine is different.
These carrots are delicious. They are garlicky and tangy from the fermentation, a hint of dill, and not nearly as salty as my previous version. That’s because, in the anaerobic jars, the brine is different and tends to be much less salty than the brine that we are all accustomed to from the Mason jar days.
These carrots taste best when they are really cold. Kids love them, so I hear, so if you’ve got some picky eaters in the house, you might try this ferment on them and see if they like it!
Lactofermented Garlic and Dill Carrots (Updated)
makes approx 2 liters
Ingredients
- 16 large carrots, chopped into coins (about 1/4 inch thick – I used my awesome food processor)
- 5 cloves fresh garlic, sliced, diced, or crushed (your choice)
- 1 bunch fresh dill (more or less to taste)
- 1 quart of 2% brine (19 grams of salt to 4 cups of water)
- 1 extra carrot for your weight (more about this below)
Instructions
- Slice your carrots into coins. I used my food processor on the thickest setting for this. You could also do carrot sticks if you prefer.
- Slice your fresh garlic and place in the bottom of your anaerobic jar.
- Add your fresh dill (washed and left whole, not chopped) to the bottom of the jar with the garlic. I kind of layered mine a little, as you can see in the picture above.
- Pack the carrots into the jar, as tightly as you can. If you do sticks, you can stack them to make a snug fit. If you use the coins, then just pack them as best you can. Only fill the jar to the shoulder and never above. You need to leave some expansion room. Really pack them in there. Use your fist to press the carrots firmly into the jar.
- Take your extra carrot and make some very thin slices, about 3 inches long and about 1/8 inch thick. You will need about 8 of these slices.
- Place your carrot slices across the top of the carrots that are being fermented. This will create a type of “floor”, where your weight can sit. It will help keep all of the carrot submerged and help them ferment completely. See picture below.
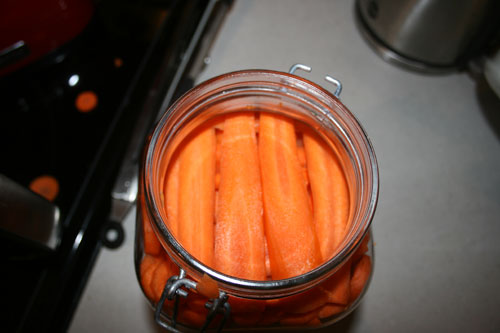
7. Place your weight on the “floor”. See picture below.
8. Pour your brine over your carrots. you want the brine to cover the top of the weight, but not be too much higher than the shoulder. You need a good inch of expansion space. Press down on the weight firmly to remove any air bubbles that may have gotten caught. Do this carefully, as not to dislodge your “floor”.
9. Insert the airlock into the anaerobic jar’s lid and add 1.5 tbsp. of water. Close the latch on the lid and make sure it is secure.
10. Move your carrot to a spot in your house where it will can be undisturbed for about a week. Wrap the jar in a towel to keep out any UV light, which damages the bacteria.
11. Let the carrots go for 2-3 days and then check them. You should see bubbles on the inside of the jar. This means there is active fermentation happening. The carrots will be done when there are no more bubbles rising to the top (mine took 7 days). You can tap the jar to see if there are any bubbles. When there are no more, you can move to the fridge and let chill completely before eating.
Delicious Obsessions is a participant in the Amazon Services LLC Associates Program, an affiliate advertising program designed to provide a means for us to earn fees by linking to Amazon.com and affiliated sites.Read our full terms and conditions here.

I have a question. I just moved some brined cucumbers into a smaller jar in the refrigerator. Can I reheat the brine and reuse it? It seems plenty salty.
Hi SJ – I would recommend just using the brine in salad dressings, etc., rather than reusing it. You’ll also preserve the probiotic benefit that way, if they are Lactofermetned. Does that help? 🙂
Can dried dill be used in place of fresh? And if so, any ideas how much dry dill equals ‘a bunch’ of fresh? 🙂 Thank you!
Hi Cyndi – I don’t recommend using dried dill, as it tends to float to the top and sometimes can get moldy. The reason I recommend the fresh is because you and pack it safely at the bottom so you don’t end up with any floaters. For ferments where you have a brine, you want to ensure that everything stays submerged below the brine, in order to prevent spoilage. Dried herbs are hard to keep contained! Hope that helps! 🙂
I just tried making these because I love pickles, and these are awesome! I love them!
There is just one problem, I was trying to google some info on what other vegetables could be pickled, and found out that pickled veggies can cause cancer!
I never knew this, I could eat a jar of pickles (or these carrots) by myself in one sitting! This stinks!
Hi Yvette – Thanks for stopping by and I’m glad you enjoyed the recipe! I’m assuming you’re referring to this article, or one similar to it: http://www.newser.com/story/119965/so-do-pickles-really-cause-cancer.html? I have read that same article, but I really am not worried about it. Keep in mind that there is a big difference between vinegar pickling and lactofermenting. They are two completely different processes. Lactofermented foods are among some of the best foods you can eat, because they are full of beneficial yeasts, bacteria, vitamins, and minerals. We all live in a very toxic world, with nutritionally deficient foods, which leads to unhealthy guts. True health lies in the gut and lactofermented foods are one of the most important foods to eat in a real food, balanced diet. I personally do not worry about getting cancer from lactofermented foods, but that’s just my opinion. 🙂
Thanks Jessica, that makes me feel a little better, I don’t know if I could give up pickles, sour kraut etc. It does say that these studies are based on Asian cultures, who a lot of times replace the fresh vegetables with the pickles. My family always eats more fresh vegetables, so I think we’re ok… Thank you!
I am assuming once your ferment is finished in the pickleit jar you can move it to a different clean jar for storage in the fridge? I do want to buy some but they are quite expensive so would not want to just use them for storage if I do not have to.
Hi Anne-Marie – I don’t transfer jars, as that would disturb the ferment too much. I do switch lids though. The PI lids are interchangeable with regular Fido jar lids, so I just take off the PI lid and put on a solid Fido lid. Leave the ferment in the same jar though, at least to start. When you’ve used up a quarter or so of it, you can move it to a smaller jar. I have been told that you want to keep as little head space at the top as possible to extend the life of your ferment, but I am the first to admit that I always forget to do this! 🙂 Does that help?
Why can’t you use this receip in a mason jar?
Hi Susan – I don’t advocate using Mason jars anymore. They don’t allow for all of the proper stages of fermentation, the risk for mold is high, and you lose out on much of the gut-healing benefits. I discuss this in my post here: https://www.deliciousobsessions.com/2012/05/52-weeks-of-bad-a-bacteria-week-18-fermenting-methods-weve-had-it-all-wrong/. You could try making is just as the recipe states, but just use the jars you have, but I can’t guaranteed the quality of the ferment at completion. Sorry, I know that’s not much help!
i don’t have any fancy jars. what advice can you offer for doing this ferment in a regular pickle jar?
Hi Jen – I’ve never done this specific ferment in a Mason jar or regular jar, as I no longer advocate using them. They don’t allow for all of the proper stages of fermentation and the risk for mold is so high, something I can’t risk with my leaky gut. You could try making is just as the recipe states, but just use the jars you have.
What do you use for the ‘weight’?
Hi Ann – I use a small glass lid from my smallest Fido jar. It fits perfectly. It’s the 6oz size. You could also use something else that is glass or even a flat stone that has been sanitized in boiling water.
Hi,
I have been making Kefir in ‘Fido’ jars for a good few months now and plan to also start fermenting some veggies too. Is a Fido jar ok, as I can’t really afford an anaerobic jar. I’ve never had any problems with mould growing on it.
The Fido jar is the one with the lid with the metal clasp and rubber seal isn’t it???
Hi Sally – There are mixed opinions on the Fido jars for ferments because there is no way for the jar to off-gas. I did use to ferment in Fidos with no issues, though some people say that the lack of off-gassing ability can break the jar or create the wrong environment for the good bacteria. I did eventually save up some money to invest in a few Probiotic Jars. I just looked at those as an investment in kitchen equipment that I will use for a lifetime. Hope that helps! 🙂