
FTC Disclosure: Delicious Obsessions may receive comissions from purchases made through links in this article. As an Amazon Associate I earn from qualifying purchases.Read our full terms and conditions here.
{This article is shared today with permission from Dr. Mercola. Composting is something that I have wanted to do for some time now, but I just don’t have much space where we live. Dr. Mercola offers some great tips and tricks in this post for how to get started composting, no matter where you live. ~Jessica}
By Dr. Mercola
Do you compost? If the answer is no, then maybe you believe it’s too complicated or time consuming, or too smelly—or perhaps you think you lack a suitable place to do it. I have been composting for the past two years now and have learned how to refine the process.
If any of these is true, then I have great news: there is a simple composting method for you, regardless of your living situation or circumstance. Nearly all composting challenges are easily remedied.
The list of reasons we should compost is growing longer all the time. Whether you live on a farm or in an apartment, there is a composting method that will likely work for you! In this article, I will discuss the basics of composting, what you need to get started, and how to troubleshoot the most common problems, should they occur.
Why Compost?
Before getting into the composting “how-tos,” let’s consider why it is so important to compost today. Composting has wide-ranging benefits for you and the environment.1, 2
Benefits of Composting
- Increases infiltration and permeability of heavy soils, which reduces erosion and runoff and protects our waterways
- Improves soil’s water retention capacity, which reduces water loss and leaching; for example, a mere five percent increase in a soil’s organic material quadruples its water holding capacity3
- Supplies a variety of organic matter, slow-release nutrition, and beneficial microorganisms to the soil, which improves plants’ health and ability to resist disease
- Optimizes soil pH
- Helps the soil bind and break down specific pollutants, such as VOCs, heavy metals, and toxic chemicals such as pesticides and herbicides
- Diverts materials away from landfills, which is of great importance today; food scraps and yard waste make up 20 to 30 percent of what ends up in landfills4
- Reduces greenhouse gas emissions—including methane, which is 72 times as potent than carbon dioxide as a greenhouse gas5
- Economic benefits include reducing the need for crop irrigation, application of toxic agricultural chemicals, and conventional soil remediation
Composting Basics
Composting is part art and part science. So, let’s start with a good working definition. Bentley Christie, aka “the Compost Guy,” defines composting as “a bio-oxidative decomposition of organic wastes under controlled conditions, which results in a stabilized, humus-rich material.”
Realize that compost happens with or without the help of humankind—it’s happening right now on forest floors, in farmers’ fields, and in your yard. But oftentimes it’s a slow process and we want to speed it up—hence the “under controlled conditions” part of the definition.
How do you speed up the natural process of decomposition? The answer involves tinkering with the four basic elements in the compost recipe:6
- Water
- Air (Oxygen)
- Temperature (Heat)
- Organic material
I’ll discuss organic material in a moment, but basically, composting is as simple as piling up your organic matter, adding a little moisture, and letting nature do its thing. Composting is an aerobic process, so the more you turn the pile, the more your little microbes will be able to “breathe.” If the pile is large enough, it heats up—and the warmer it gets, the faster you’ll have compost.
The challenge is in creating optimal conditions of moisture, oxygenation, temperature, and the right combination of organic matter to make your microbes happy. The “smell test” is a reliable barometer of how well you doing toward that end. For a complete discussion of the biology of composting, Composter Connection has a comprehensive article.7 And WikiHow has an excellent description of the composting process, complete with color photos to guide you.
What You’ll Need
For most home gardeners, your basic compost kit should include the following:8
- Envirocycle Original Composter Green waste(see chart below)
- Brown waste(see chart below)
- Lidded container in or near your kitchen for collecting kitchen scraps (the lid helps prevent bugs)
- Spade (for removing finished compost from the bin and spreading it around the garden)
- Empty 5 gallon bucket
You can compost in a pile, in a box or a bin. I prefer the Envirocycle composter and have one at home and two at the office. They are very convenient but do cost around $200 on Amazon. Less expensive options include making your own from wood, recycled plastic, or even chicken wire. However, the extra time and effort from having to turn the piles may make it more expensive in the long run.
Tumblers (rotating drums) are great because they make aeration a breeze—all you have to do is turn the drum every few days, which takes less effort than turning a pile with a fork or shovel. Tumbler turning is a fun task for children! They are also MUCH faster to compost. If you follow the tips I provide, you can get great compost in as little as a 1-2 weeks, while the piles will take many months to digest. I actually use the same tumbler composter shown in the Sierra Club video.
Many local municipalities also have bins available for a reasonable price. For the best moisture and temperature regulation, select bins that hold at least one cubic yard. Your compost zone should be conveniently located, as close as possible to your source of raw materials (kitchen scraps, lawn clippings, etc.)… where it won’t be too much of an eyesore. If you are using piles or bins, I recommend having two of them as then you’ll have a place to put fresh scraps while one full “batch” of compost finishes curing.9
Green + Brown = Happy Compost
A critical part of successful composting is achieving the right balance of organic matter. You’ll need a certain ratio of green stuff (higher in nitrogen) to brown stuff (higher in carbon) to “heat activate” the process. Nitrogen-rich materials, also known as wet stuff, would include your kitchen scraps, grass cuttings, etc. Carbon-rich materials (also called dry stuff) tend to be dry and brown, such as cardboard, newspaper, fallen leaves, sawdust, hay, etc., and serve as “fiber” in your decomposing heap. Avoid animal-based materials, fats and oils, grains-based foods and synthetic fibers.10
How much green and how much brown? This question is a bit difficult to answer definitively. This is where the “art” of trial and error comes in. Experience must be your guide… you’ll learn to “read” your compost pile. Adjusting aeration and moisture is easy, but tweaking the carbon to nitrogen ratio can be a little trickier. Compost scientists (yes, they do exist) recommend a carbon to nitrogen (C:N) ratio of about 25-30:1. The idea is to mix in green and brown stuff that adds up to that ideal ratio, or something close. Composting10111 has a handy table of C:N ratios for common organic materials. You’ll note from that table that cardboard, newspaper and wood chips are the most concentrated carbon sources.
As a general rule of thumb (and I do emphasize general), you’ll need two to three times as much brown matter as green.
If C:N is too high (excess carbon), you’ll know it because decomposition slows way down. If C:N is too low (excess nitrogen), you get a stinky pile of goo. But don’t despair—both imbalances are fixable! I will discuss fixes for common problems in a moment, but first, let’s look more specifically at what you can add to your compost heap. The following table will give you a better idea about what to toss into the mix.
Green Stuff (Nitrogen- Rich)
- Grass cuttings
- Weeds (before they develop seeds)
- Manure from grazing/ herbivores (chickens, rabbits, horses okay, but NOT cats and dogs)
- Fruits and vegetables
- Coffee grounds12, tea leaves, tea bags
Brown Stuff (Carbon-Rich)
- Fallen leaves
- Twigs, sawdust, animal bedding/shavings
- Cardboard tubes from toilet paper and paper towels, paper plates and cups, paper bags, etc.
- Dried flowers
- Hay or straw
- Cotton clothing, torn up (limited quantity)
- Human or animal hair/fur
- Egg shells
- Corn husks or stalks
Stuff to Avoid
- Meat, fish or bones
- Plastic or synthetic fibers
- Manure from carnivorous animals
- Weeds gone to seed
- Any diseased plants or plants with chemical residue
- Fats, oils, and nuts
- Bread, pasta, or other grain-based foods
- Nuts, citrus very slow to decompose
- Glossy paper
- Cat litter
Helpful and Practical Tips I Learned Using a Compost Tumbler
You don’t have to chop everything into little pieces, but the larger the pieces are, the longer the compost will take. Pulp from your vegetable juicing is about as good as it gets. Otherwise, one-eighth to one-half inch particle size is ideal.13 The mass should be kept about as damp as a well wrung-out sponge.
My composting took a dramatic step in the right direction after I started growing sprouts for my daily salad. The sprouts require some high quality organic potting soil and after you harvest the sprouts you are left with trays full of roots and used soil. This is PERFECT for the composter. Just be sure and break up the soil into as small as chunks as you can as this will radically speed up the process. This really jump starts the process and nearly eliminates the need for the brown additions you need in a regular pile.
The other tips I have learned is that I purchased a 50 pound bag of sustained release azomite, which is a phenomenal rock powder that adds important minerals. I typically put ½ to 1 pound of azomite powder into my bin once a week. But the real secret is to use powdered charcoal that I saturate with some of the compost tea that I make every day. I fill a quart mason jar half full of the charcoal and put the tea in to the top and stir it around until the charcoal is nice and wet; then I add that to the compost tumbler and turn it three times. I add the tea and charcoal once a week, and since I have been doing that I have unbelievable compost in about two short weeks that I can then use in the garden.
One warning that I have learned though is this is HIGHLY active compost and is tuned to breakdown waste. So do NOT use it on fresh seedlings that you are seeking to establish. Typically, the bacteria nourish plants, but in the early stages if you give them too much compost, it will actually eat the seedlings.
If You’re Using a Compost Pile
A regularly turned pile will stay hot for several weeks, typically around 120 to 150 degrees F (hot enough to kill most weed seeds and pathogens), and shrink in volume by about half. Once the “hot phase” has completed, it needs another one to two weeks to cure, at which time the temperature will fall to between 80 and 110 degrees F. The final product will be dark and crumbly and have a pleasantly earthy aroma. In the winter, it will take much longer, but it will still work—just expect your compost to take several months rather than weeks to mature.
Very fresh compost can rob the soil of nitrogen as it continues to break down, so apply it with caution. If you think your compost is not all the way done, either leave the compost in the bin for a while longer, or spread it on your garden and let it sit there for a few weeks before planting anything in it. Once you have a beautifully cured batch of black gold, its uses are many—your vegetable garden, ornamentals, trees, shrubs, lawn and even your houseplants will be begging for first dibs.
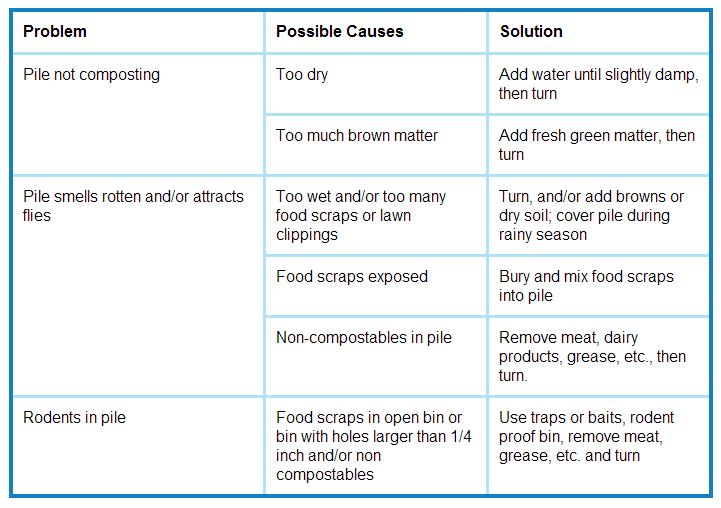
Troubleshooting the Stuck or Stinky Pile
Sometimes, in spite of our best efforts, things don’t go exactly as planned. Just as with anything new, there’s a learning curve. For example, if your composting mass becomes stinky, you may have inadequate aeration, causing your microbial community to shift toward anaerobic. Or you might have too much of one kind of organic matter and not enough of another. Either way, there’s a simple fix—there just aren’t that many variables! Below is a handy table outlining the most commonly experienced compost problems and how to correct them.14
Plants’ Favorite Beverage: Compost Tea
I started making about 15 gallons of vortexed compost tea every day since the spring and have been very impressed with the results in my garden. It really is an advanced tool and I hope to do an article and video on that in the future. I was intrigued with the concept after I visited the Rodale Institute, which has been doing farming research for over 70 years, and their conclusion was compost tea was their most important and powerful tool. After experimenting with it for a few months, I would have to agree. It is nearly magical but does require a very serious commitment.
Waste Not, Want Not
High performance agriculture is one of my new passions and I am convinced that properly applied, it will not only allow you to grow incredibly healthy food for your family but it will also help create a movement that will help to restore the ecological balance to the earth that has been so radically decimated with conventional farming techniques.
As our global population continues to grow, our resources will continue to shrink. Composting is one way you can turn your waste into a fantastic resource, with ecological benefits extending far beyond your backyard. Composting is relatively easy, fun and rewarding. Learning the art of composting is not as daunting as you might think. Whether you have a huge compost heap in your backyard or a modest worm bin on your patio, composting is doable in just about any living situation.
4 Comments