

FTC Disclosure: Delicious Obsessions may receive comissions from purchases made through links in this article. As an Amazon Associate I earn from qualifying purchases.Read our full terms and conditions here.
I have wanted to write this post for quite some time, but things just keep getting in the way. I’ve had a lot of requests over the last couple months about writing about kombucha and I really hope this post helps anyone who is interested in starting to brew their own kombucha. I was SO intimidated at first so that is why I really want to share this beginner’s guide to batch brewing with you today.
I wrote about this fermented beverage back in January and covered a lot of the health benefits and history of kombucha, so I’m not going to go into that in this post. You can check out this post from Kombucha Kamp for more in-depth reading about kombucha health benefits.
As a reminder, SCOBY stands for Symbiotic Colony of Bacteria and Yeast.
Like kefir and other fermented/cultured foods, kombucha is a great source of beneficial bacteria that help heal and maintain our gut. I always say, if your gut’s not healthy, then you’re not healthy.
Brewing kombucha is SO easy! It can be intimidating at first, but let me tell you – there is no reason to be intimidated. It’s simple and FUN! I love brewing it now and I wish I had started brewing it earlier in my life. I think about all the money I could have saved (since booch is now a minimum of $4.00 a bottle). So, let’s get started.
In this post, we are specifically covering batch brewing. You may hear me refer to batch brewing and continuous brewing for kombucha around this site. They are two completely different methods, each with their own pros and cons, but there is no right or wrong way to brew your own booch. I say go with whatever method appeals most to you.
I personally love both methods and was a prolific batch brewer before I gave continuous brewing a try. To be 100% honest, I prefer batch brewing. I think it’s because batch brewing is how I started out and I have a deep connection to the process. If you want to learn more about batch brewing, please read Continuous Kombucha Brewing: How To and Why.
Supplies Needed For Brewing Your Own Kombucha

Before we can start brewing, we need to gather some supplies. I have outlined everything you need in this post to successfully batch brew your kombucha.
Batch Brewing Kombucha Supplies
- 2 non-leaded gallon glass jars (You can also use stainless steel or oak containers, but I personally prefer glass)
- 1 BPA-free plastic or silicone funnel (for bottling)
- Organic black tea (I typically use loose tea, but tea bags work too — see note below)
- Plastic strainer or infuser (if you’re using tea leaves instead of bags)
- Organic cane sugar
- Distilled white vinegar
- Healthy Active SCOBY (you can buy these online from Kombucha Kamp or Cultures for Health but it’s most fun if you can find a family member or friend who has an extra)
- Filtered water
- Tea towel, a t-shirt, or some other clean cloth with a super tight weave
- Rubber bands (big enough to go around the jar)
- Flip-top bottles with tight lids (If you know a Grolsch drinker, have them save the bottles for you. You can also find flip-top bottles on Amazon for a great price)
Optional, but HIGHLY recommended:
- Glass measuring cup with a pour spout (for bottling — this makes life A LOT easier!)
- Extra gallon glass jar(s) for collecting SCOBYs
- Fruit (fresh, frozen, or dried) or juice of your choice for flavoring
Note on Tea Bags: I personally don’t like using tea bags but will if they are all I have. There has been some evidence of chemicals being used in the bags themselves. I also have read that sometimes wheat is used in the glue that seals the tea bags together, making them a risk for those with gluten allergies. I personally prefer loose leaf organic tea and would recommend that if at all possible. You can find a bunch of loose leaf organic black teas here.
Brewing Your First Batch of Kombucha
OK – Now that you have gathered your supplies, it’s time to brew your first batch. Getting started is so easy. Yay! Let’s go!
First, here are a few important things to remember before you start:
- First and foremost, DO NOT wash any of your kombucha brewing supplies with soap!!!!!!!! Soap residue can often kill the bacteria and yeasts in the SCOBY and will render it useless.
- To sanitize your supplies, you can use hot water and then rinse thoroughly with white vinegar. Be careful when washing your glass items with hot water to avoid breaking. I boil mine in water and I have had no problems so far (knock on wood) with boiling my bottles and jars, but please do use extreme caution if you choose to do this. Just because I haven’t had any problems doesn’t mean accidents can’t happen.
- Don’t use tap water – the chlorine will kill the SCOBY. Filtered water only!
How to Brew Your First Batch of Kombucha
This recipe is for one gallon. I find this to be a manageable amount for my family, but if you know you will drink more than that then you can easily double, triple, or even quadruple your batches. You will just need additional ingredients and brewing vessels.
1. Brew your first batch of black tea. You will need:
- 3-4 quarts filtered water
- 1 cup organic cane sugar
- ¼ cup organic black tea leaves or 6-8 organic black tea bags (This makes a pretty strong tea – if you want a weaker batch, you can use less tea. Play with it until you find what works for you)
- 1 cup of distilled white vinegar (unless you have some starter liquid from another batch)
- 1 active SCOBY culture (you can buy these online from Kombucha Kamp or Cultures for Health)
2. Heat 1 quart of water. Place your tea in your brewing vessel and add the hot water. Brew your tea for about 10 minutes and then remove the tea bags or leaves. Add your sugar and stir or swirl around until dissolved. Add 2 more quarts of cold, filtered water and test the temperature. You need the mixture to be room temperature. NEVER add your SCOBY to water that is too hot. It will kill it!
3. Once the liquid has cooled, you can now add your SCOBY. But first, you need to sanitize your hands. That way any bad bacteria that might be on your hands will not be transferred to the SCOBY. To do this, rinse your hands in distilled vinegar and shake off (I don’t dry them because I don’t want to risk contaminating them). Now, you can handle your SCOBY.
4. Take the SCOBY and place in your brewing vessel with the cooled tea and sugar mixture. Pour 1 cup of the starter liquid (or vinegar) in and fill the rest with filtered water, leaving an inch or two at the top.
5. Cover with your tight weaved cloth and secure with a rubber band. Move to a warm, quiet place where it won’t be disturbed. Now it’s time to let the SCOBY work its magic. I know it’s hard, but you have to walk away and leave it alone. Don’t mess with the vessel during the initial brewing period.
6. Typically brewing time is 7-14 days. The amount of time depends a lot on the temperature of your house and the taste that you prefer. After 7 days, take a straw and taste a little of the kombucha. If it’s too sweet, then you need to let it go longer. If it tastes vinegary or tart, you can reduce the brewing time next time. It’s important to remember that it will take a few batches for your SCOBY to get up and running at full strength. So, don’t get discouraged if your first couple batches don’t taste quite right.
Bottling Your First Batch of Kombucha
Now comes the fun part! Creating magical flavor combinations to tickle your taste buds. Once your kombucha has reached a flavor that satisfies you, you can either drink it as is, or you can bottle it up with some flavorings and do a second fermentation.
Gathering Supplies
Before we get started with our second ferment and flavoring magic, let’s gather the supplies you need for this process.
- Sanitized flip-top glass bottles with tight lids
- Glass measuring cup with pour spout (you can try to pour the kombucha from the gallon jar, but depending on your bottles it might go everywhere if you pour it)
- BPA-free plastic or silicone funnel
- Fruit or juice of your choice – you can use fresh or frozen fruit
- Your other brewing vessel (gallon glass jar) or clean dish for your SCOBY
How to Prepare Your Second Ferment
- Sanitize your hands with the vinegar
- Remove the SCOBYs from the brewed kombucha and set aside. You should have two SCOBYs now – your original one and the new one that formed during this brew.
- Reserve 1 cup of brewed kombucha as your starter liquid for your next batch.
- Place any fruit or flavorings directly in your jars (see “recipes” below)
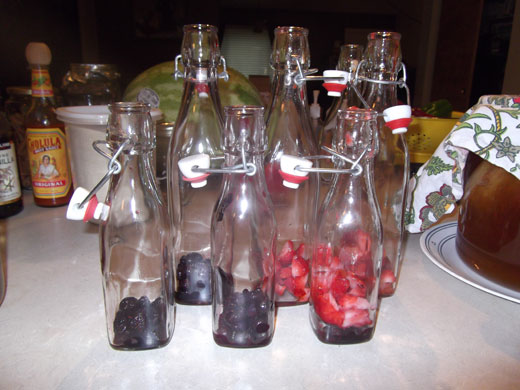
- Insert your funnel into your jar(s) and pour or scoop the brewed kombucha in. Fill your jars to the top for increased carbonation. The flip-top bottles seem to yield much fizzier results than any other style bottle that I’ve tried.
- Put the tops on and place in a dark, warm place where they can ferment undisturbed for 3-5 days. If you fill your bottles super full, you will need to burp them daily to help release some of the carbonation. I’ve read of people whose bottles have exploded and injured them, though this has never happened to me. Just use caution with this step. I store mine in my pantry in a cardboard box with a towel over it, just in case.
- Once the second fermentation time is done, move the bottles to the fridge to slow down the fermentation and build up of carbonation.
- Drink and enjoy!
Kombucha Flavor Recipes
There are no firm recipes or rules when it comes to flavoring kombucha. You can use any fruit (fresh, frozen, or dried) or fruit juice that you’d like. For my 20 ounce bottles, I typically use around 2 tablespoons of fruit juice and/or about 1/8th of a cup of fresh or dried fruit. I really never measure it out, so the “recipes” are just general guidelines. To increase fermentation and fizziness, you can add a pinch of sugar into the bottle before the second fermentation.
I created a water kefir flavor guide which has a ton of flavor combo ideas that you can easily use for your kombucha. You can read my Water Kefir Flavor Guide here.
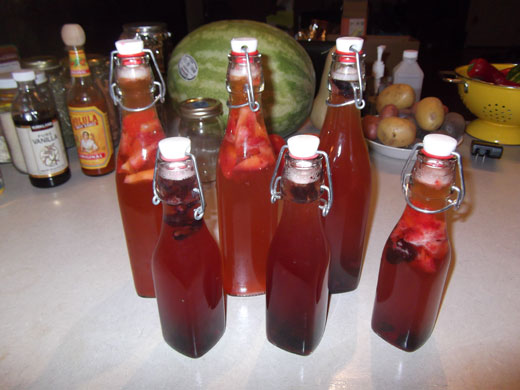
These are just a few of my favorite combinations. Anytime I use fruit (frozen or fresh), I mash it up, which not only helps it fit in the bottle but also helps it release more flavor during fermentation.
- Lemon Ginger – 2 tablespoons fresh lemon juice, 1 tablespoon fresh diced or grated ginger
- Strawberry Lemonade – 1/8th cup fresh or frozen strawberries, 1 tablespoon fresh lemon juice
- Mixed Berry – 4 blueberries, 4 blackberries, 4 raspberries
- Strawberry Grapefruit – 2 strawberries, 1-2 tablespoons grapefruit juice
- Strawberry Blueberry – 2 strawberries, 4-6 blueberries
- Fizzy Lemonade – 2 tablespoons fresh lemon juice, ½ teaspoon sugar
- Orangeade – 2 tablespoons fresh orange juice, ½ teaspoon sugar
- Fruit Punch – 1 orange slice, 1 strawberry, 1 blackberry, 1 teaspoon lemon juice, pinch of sugar
You really can use any combination of fruit you want. You can also use herbs and flowers to flavor your kombucha, though hubby and I haven’t branched off in that direction yet, as we are still hooked on the fruit flavors.
You’ve Bottled Your First Batch – Now What?
Once you have your bottles prepared and stored, you can start another batch of kombucha. Simply repeat the steps above for Brewing Your First Batch of Kombucha. So far, I brew about two to three gallons per month. My rotation seems to work pretty well. It’s just two of us drinking it, so any more than that, and I’d run out of bottles and space to store!
The key to kombucha is to HAVE FUN! It’s pretty difficult to “mess it up” if you just follow the guidelines in this post. Just remember a few important things:
- Never use soap on any of your brewing equipment.
- Never use tap water – chlorine kills the SCOBY.
- Always sanitize your equipment and hands with hot water and/or white vinegar.
- Always reserve 1-2 cups of brewed kombucha for your starter liquid in a new batch.
- NEVER put your SCOBY in water that is too hot! Wait for your liquid to cool to room temperature.
- Don’t disturb your brewing vessel during the first 7 days of brewing.
What to Do With Your Extra SCOBYs
One thing you will notice after awhile is that you will have SCOBYs building up. For each batch that you brew, you will create a new SCOBY. There are several things you can do with them.
- Share with your friends and family – this is one of the most fascinating things about cultures is that you can share them with others and they travel around the country! For example, my very first culture came from a friend in New Mexico and it was from a culture that was many, many years old.
- Use them for test brews with different types of tea and even coffee. I’ve never brewed with coffee, but I have heard it works well.
- Feed them to your dogs. Dogs need beneficial bacteria too. I don’t recommend giving them a ton at a time to start, but a small slice would be a good treat, assuming your dog would eat it. You can pour brewed kombucha on their food. You can also dehydrate them and use them as “rawhide” treats.
- Create a SCOBY hotel (see pic below). I have done this and now I have extras should an emergency arise like mold or fruit fly infestation.
- Stick them in your compost.
- Blend it up in a food processor and use on your skin. It will increase circulation and help renew and exfoliate skin cells. Your skin might be a little red after the application. Let it sit on your skin for a few minutes and then gently wipe or rinse off. Always test a small section of skin first for sensitivity. You can also just lay the culture on your face.
- Use them on wounds, boils, cuts, etc. I have heard of SCOBYs referred to as “living band-aids”. So awesome! Applying strips of the SCOBY to wounds can help spread the healing and prevent infection.
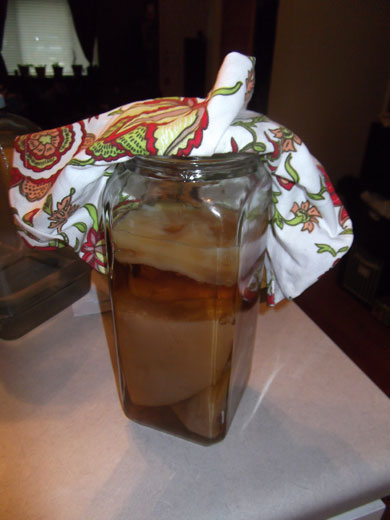
Scoby Hotel for extra kombucha tea SCOBYs
So, are you ready to start brewing your own kombucha tea? I hope that this guide has been helpful and that you will give it a try! I can’t wait to hear your feedback and comments, so tell me what’s on your mind!
If you’re interested in learning about the Continuous Brewing method to make kombucha, check out this post that I wrote.
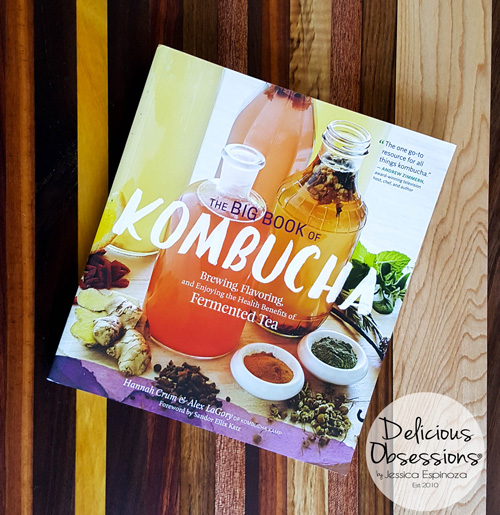
The Big Book of Kombucha
My favorite kombucha guru, Hannah Crum, is releasing an AMAZING new book (March 2016) called The Big Book of Kombucha: Brewing, Flavoring, and Enjoying the Health Benefits of Fermented Tea.
This book is an amazing resource for anyone who loves kombucha, whether you are new to brewing or a seasoned expert. Everything you need to know about brewing, flavoring, bottling, troubleshooting, etc. will be covered! Order it on Amazon here. You can also check out my review of this awesome new book + get a super tasty kombucha and kale smoothie recipe here.
168 Comments