FTC Disclosure: Delicious Obsessions may receive comissions from purchases made through links in this article. As an Amazon Associate I earn from qualifying purchases.Read our full terms and conditions here.

Who doesn’t love peanut butter cups?
Ok, Ok. I guess I know a couple of people who don’t, but I’d venture to say that the mass majority of us love them.
They are one of my husband’s favorite candies, and as usual, I had to try to figure out a way to make them healthy!
These are made with coconut oil, so they need to stay in the fridge or the freezer, or they will melt into a little puddle of chocolate sauce (but it’s OK if that happens – it tastes good on ice cream!).
You could use any nut butter that you like if you’re not eating peanuts. Sunbutter is especially delicious, but almond is also delish!
Coupons and Freebies for Healthy Homemade Nut Butter Cups Ingredients
I am always asked about my favorite ingredients and what I use in my own kitchen. I have linked to the products from my affiliate partners that I personally use and recommend. And now, here are the special coupon offers that select affiliate partners are currently offering:
- Thrive Market: If you sign up through this link, you will get 15% OFF your first order.
- Amazon, of course, has everything you need for this recipe. Their prices are often very good, though I love to shop around and sometimes find that Thrive Market has better deals. If you like saving money, it’s good to shop around! 🙂
- I get all of my herbs and spices from Mountain Rose Herbs. I have tried so many other brands and have never found the quality, flavor, and aroma to be as good as the herbs I get from Mountain Rose.

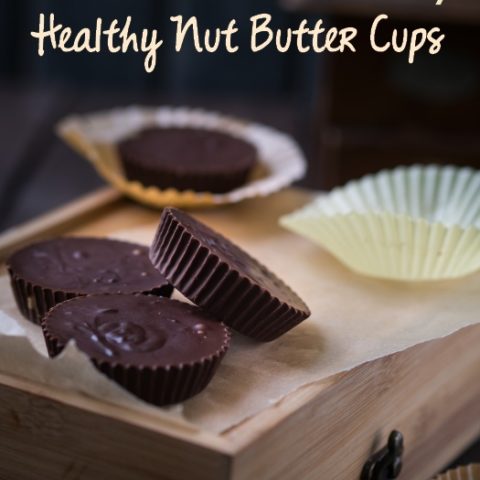
Healthy Homemade Nut Butter Cups With Coconut Oil
Skip the store-bought candy and make your own at home with this EASY recipe! Enjoy the classic flavors of chocolate and your favorite nut butter without all the added junk.
Ingredients
- 1 cup coconut oil
- 1/4 cup honey or maple syrup (or sweetener of your choice)
- 1/4 cup organic cocoa powder
- dash of sea salt
- Nut butter of your choice (chilled - I love cashew butter in these!)
Instructions
- In a double boiler or a saucepan over very low heat, melt the coconut oil and sweetener (if using honey, you will need to whisk until the honey is dissolved).
- Add the cocoa powder and salt and whisk vigorously until well combined. Remove from the heat.
- Either pour or use a spoon to fill your cups/molds 1/4 full (I find a glass, Pyrex measuring cup works great). See the notes below for mold suggestions.
- Stick the cups in the freezer for about 10 minutes or until the chocolate is hard.
- Remove from the freezer and using a 1/2 teaspoon measuring spoon, scoop the chilled peanut butter out and place it in the cups. You can use the back of the spoon to press them down just a tad, but leave room for the chocolate to get all the way around the peanut butter.
- Next, pour or spoon the chocolate over the peanut butter until the cup is almost full and the peanut butter is covered.
- Place back in the freezer for 30-60 minutes. Now, they are ready to eat! Don't forget to store in the fridge or the freezer to keep them from melting!
Notes
You can use pretty much anything to make these - ice cube trays, muffin tins, mini muffin tins, etc. I use silicone mini muffin tins like this, as well as these awesome little silicone baking cups. The mini silicone baking cups work the best in my opinion and give you the most "realistic" Reese's Peanut Butter cup look.
Recommended Products
As an Amazon Associate and member of other affiliate programs, I may earn a small commission from qualifying purchases.
-
Nutiva Organic, Cold-Pressed, Unrefined, Virgin Coconut Oil
-
Coombs Family Farms Organic Pure Maple Sugar, 6-Ounce
-
Anthony's Organic Cocoa Powder, 2lbs, Batch Tested and Verified Gluten Free & Non GMO
-
Redmond Real Sea Salt - Natural Unrefined Organic Gluten Free Fine, 10 Ounce Shaker (2 Pack)
-
IPOW 24 Pack Silicone Cupcake Baking Cups Reusable Food-Grade BPA Free Non-Stick Muffin Liners Molds Sets, 2 Shapes Round Rectangle
-
Lucentee Silicone Muffin Pan for Baking, 24 Cup
Nutrition Information:
Yield: 15 Serving Size: 1Amount Per Serving: Calories: 41Total Fat: 2gSaturated Fat: 1gTrans Fat: 0gUnsaturated Fat: 1gCholesterol: 2mgSodium: 11mgCarbohydrates: 6gFiber: 0gSugar: 5gProtein: 1g
IMPORTANT! PLEASE READ!!! This website provides approximate nutrition information for convenience and as a courtesy only. Nutrition data is gathered from Nutritionix and we often find their calculations to be slightly inaccurate based on the whole food ingredients we use on this site. Nutrition information can vary for a recipe based on many factors. We strive to keep the information as accurate as possible, but make no warranties regarding its accuracy. We encourage readers to make their own calculations based on the actual ingredients used in your recipe, using your preferred nutrition calculator.
Delicious Obsessions is a participant in the Amazon Services LLC Associates Program, an affiliate advertising program designed to provide a means for us to earn fees by linking to Amazon.com and affiliated sites.Read our full terms and conditions here.

These sound pretty easy to make. Have you tried a different sweetener? I don’t have stevia on hand. I think honey would add too distinctive a flavor, but maybe maple syrup would work?
Hi Barb! Thanks for stopping by 🙂
I’ve used both honey and maple syrup before. I haven’t personally noticed any strong taste from either one. Coconut syrup or brown rice syrup would be another option. The stevia really is optional. It won’t be quite as sweet w/out it, but that’s not necessarily a bad thing either! 🙂
I used Agave nectar and it worked great. 🙂
Awesome idea! I gotta try this one out- always looking for treats for my kids that are dairy free, sugar free, and gluten free. Thanks for sharing with the Hearth and Soul blog hop!
Hi there! Thanks for coming by and commenting! They are delish. I’m trying to come up with more healthy candy recipes, so it’s been a fun process! Lots of trial and error! 🙂
I had trouble commenting earlier in the week. Thank you for sharing this recipe with the Hearth and Soul Hop. I have included it in my candy round up.
Hi Alea – I’m sorry you were having issues with the comments. Were you having trouble commenting on this post, specifically? I’ll go check it and make sure everything is working fine. Thanks for stopping by and thank you for including it in your candy round up! That is so exciting! 🙂 I look forward to checking out the other recipes!
Wow! These look amazing!
Thank you! Beware when you make them … they will disappear FAST!!! 🙂
I’m a little confused by the directions. For clarity:
I pour chocolate into baking cups 1/4 full.
Chill peanut butter
Place 1/2 teaspoon pb on top the chocolate
Then pour more chocolate on top and freeze?
Sorry if this is redundant, at first I couldn’t tell if the chocolate or peanut butter went into the freezer.
Hi KK – You got it! You want to chill that little layer of chocolate first so that the PB doesn’t sink down to the bottom of the cup. Then you can add the PB and the rest of the chocolate and chill and you’ll have PB Cups! 🙂 Hope that helps! I’ll go see if I can revise the instructions to be a little more clear. Thanks for stopping by and commenting!
Thank you for your submission on Nourishing Treasures’ Make Your Own! Monday link-up.
*drool* I have to make these! I love PB cups!
Check back later tonight when the new link-up is running to see if you were one of the top 3 featured posts! 🙂
I’ll be trying these soon w/ almond or sunflower seed butter :-)! Thanks for the tip on the silicone cups. I bought mini muffin unbleached papers so I’ll see how those work first !
Hi jessica – what’s the diameter of the mini cups? I found some at World Market but I think they are a little too big..
Hey Adrienne – I got mine at World Market too! I bet they’re the same ones. I don’t have one in front of me right now, but if I had guess, they are about an inch or an inch and a half in diameter.
I love you!! No, seriously, I really LOVE you! I just made these and they are even better than the store-bought originals or even the ones I’ve been buying at the health food store. The best part? I eat lower (not zero) carb for weight loss and health and I know I’ll still lose weight eating these. Thank you!! You’ve made my Valentine’s Day!
HAHAHA! Wow!!! Thank YOU for such kind words!!! 🙂 I am so glad you liked them and they are bringing such joy to your holiday! Your enthusiasm brought a smile to my face 🙂
What kind of peanut butter do you use for these?
I have been thinking lately that I’d like to duplicate (in a healthy way) the Peanut Butter Goodies cookies from Trader Joe’s. (These have a cookie topped with peanut butter mousse all dipped in chocolate, and topped with chopped peanuts.) I wonder if your recipe could be wrapped around a gluten-refined-sugar-free cookie? My kids love the TJ’s cookies, but I’m trying to get them to eat more healthy foods.
The PB I use is from my local health food store. They grind it fresh daily. Those TJ cookies sound amazing! I have this recipe: https://www.deliciousobsessions.com/2011/02/chocolate-peanut-butter-cookies-gluten-free/. I wonder if you could take these cookies as the base and then figure out a PB mousse? You could then use the chocolate from the BP cup recipe as the coating? Sounds wonderfully delicious in my head. I might have to go do some ‘sperimenting. 🙂 If you figure something out, let me know how it goes!
Any idea on the nutritional info on the end product? Calories, Fat, etc?
Thanks for the idea.
Oh boy. I have no idea on that — I’ve never broken it down. It’s going to be pretty high in calories and fat from the coconut oil and peanut butter, but I don’t even know how to guesstimate it. Sorry 🙁
LOVE this recipe! And I generally steer clear of dessert recipes because I don’t eat sugar or grain.
Thank you so much. 🙂
I hope you enjoy! 🙂 You could use all stevia or all xylitol if you wanted a sugar-free version.
Hi there, I made these today and we had to spit them out!! So sad. They were really bitter, I used vanilla extract instead of stevia, could that be why? And maple syrup for the sweetener. My coconut oil changes it’s smell and flavor in the two weeks it takes me to use the jar. It’s the brand NOW. Have you ever tried it? It smells really good when I first open it, but by the end it smells a little off. I even compared the two jars today and it was really noticeable. I’ll buy a different brand and see if it does the same thing…
I have no idea what would have made them bitter. I’ve never had that happen before. I don’t think it would have been the vanilla extract, but the stevia does add more sweetness to them, so maybe the lack of that did it? Sorry you had a bad experience with them. The only other thing that I can think of is that maybe your cocoa powder was more bitter than mine? Some cocoa powders can been strong and bitter, but like I’ve said, I’ve never had them be so bitter they were inedible.
Hi Jessica, I had a friend send me a conversion chart for stevia, vs sugar. It take a lot of sugar to replace stevia, and I didn’t use any thinking the syrup was sweet enough… Silly me. Anyway, I have some chocolate mixture leftover, so I will play with it and make more. One plus is that now my kids will be afraid to try them, and I’ll get them all to myself! ;). The new jar do EVCO tastes so much better in my coffee this morning, so I think I’ll try a different brand and see if it hold up better. Thank you!
YAY! I’m glad that you figured out a solution! I was bummed when you had a bad experience, because this is one of my most popular recipes. Whenever I make them, I literally have to hide a separate container for myself, or else hubby will eat ALL of them! 🙂
I am so happy I found this recipe – it’s wonderful. Thank you
Thank you for your kind words! I’m glad you enjoyed! 🙂
i don’t see it anywhere but about how many does this make with the pan you used?
I used the little individual mini-muffin holders. I believe this made about 12-15.
I think I know the bitterness issue with a previous comment. And I am glad I caught it before making the cups. But the maple syrup (or whatever sweetener you decide to use) seperates from the coconut oil and needs to constantly be wisked or else you may get a mouthful of oil and cocoa powder… Just finished making them and they are in the freezer waiting to harden! Can’t wait!!! Thanks for the awesome recipe!!! I’m crossing my fingers my husband loves them!!! I have a sneaky feeling he will!!
Ohh Ill have to make these for my hubby. He LOVES peanut butter cups and whines that I wont buy the big bag since all the Halloween candy is out!
Thanks for sharing on Natural Living Monday!
I definitely have a weakness for peanut butter cups! Thanks for sharing at Snacktime Saturday. Hope you’ll be back again 🙂
how much pb are u suppose to use for the whole recipe?
Crystal – The amount of PB you need is going to depend on the size of the pan/molds that you are using for the cups. I’ve never really measured it out. When I make a batch, they make about 12 of them, so that is about 6 tsps of peanut butter. But, like I said, it will vary.
I know this is one of your older posts, but Ididn’t know you existed back then. This is very similar to what I make but I dont heat it. I use a hand mixer and beat it adding a 1/4cup cream or coconut milk. This ensures all the health benifits of raw honey and virgin coconut oil remain intact. Also I make a version of this using coconut mana or coconut flakes processed together. My youngest had an addiction to Mounds and Almond Joy which this seemed to help with.
YUM! Thanks for taking the time to share! Sounds delish! 🙂
Can you email me the nutritional facts on the peanut butter cups?
Hi Eileen! I don’t provide nutrition info on my recipes since I feel there is much more that goes into health than counting calories, fat, etc. There are a number of sites you could use if you want to calculate it. This one seems to be one of the most popular: http://www.myfitnesspal.com/recipe/calculator. Have a great day! 🙂